There are three well-known, orthodox grips: the ” V” grip, in which the hands do not in any way overlap; the “Interlock,” in which the first finger of the left hand and the fourth finger of the right hand interlock; and the “Overlap,” or “Vardon” grip. As the last-named is the most popular, I would recommend it, and will go more fully into the details of it. I wish here to have it clearly understood, particularly by those who already have adopted one of the other grips, that while I prefer the “Vardon” I do not by any means insist on it nor do I say that it is better than any other.
It is a case of each to his own taste, and I prefer the ” Vardon.”
The “Vardon” Grip
Lay the club diagonally across the left hand, as shown in Fig. 1, and close the hand so that the grip is almost entirely in the last three fingers—the first finger and thumb should just lie on the club; get the hand around the shaft, so that when the clubhead is on the ground you can just see the knuckle at base of fourth finger—the thumb, meanwhile lying flat down on the shaft, the correct position being neither on the top nor on the side of the shaft, but midway between (see Fig. 2). Then lay the right hand on the club so that the fourth finger rests either between the first and second fingers of the left hand or on top of the first finger, and the left thumb lies in the center of the right palm. Now close the hand so that again the grip is in the last three fingers—the first finger and thumb resting lightly on the shaft and the first finger slightly separated from the others. The thumb should easily and comfortably take its position as before mentioned, midway between the top and the side of the shaft. (See Figs. 3 and 4.)
The left should always be the controlling hand and consequently should grip the club tighter than the right, so the grip with the right hand must be comparatively easy.
The right being naturally the stronger hand, care must be taken to prevent its taking control, and herein lies one advantage of the “Vardon” grip.
The fourth finger of the right hand does not touch the club at all; and the thumb and first finger only slightly, consequently one is not so likely to take control from the left hand, where it belongs.
The same method of gripping the club is applicable to all the clubs and to every shot.
As already stated, the left hand should grip the club much more tightly than the right, and complete control should be retained in the left.
If there is any fault in the relative strength of the grip of the two hands, in nine cases out of ten it will be found that the right is being held too tightly, and for this reason I have dwelt on the importance of gripping only lightly with the right.
There are some people, however, whose wrists or fingers are unusually weak. This is frequently the case with ladies, and occasionally with men. For such people it will be found necessary to let the right hand grip a little tighter than the fore-going instructions would indicate, but even then care must be taken not to take the control away from the left hand.
The Stance
There are four different stances: one for very full shots such as are made with the wooden clubs; one for long iron shots such as are made with a mid iron; one for mashie pitches; and one for chip shots.
For wooden club shots, I prefer what is known as the “square” stance. If you will look at Fig. 5, which illustrates the stance for this shot, you will see two straight lines drawn, one parallel with and the other at right angles to the line of play. The point of intersection represents the position of the ball. You will note that both feet are equidistant from the parallel line (although in the foreshortening of the photograph the right foot seems somewhat advanced) and that the right-angle line almost touches the left heel.
To get the distance of feet from ball, lay clubhead on ground, touching ball as in figure and stand so that, with knees slightly bent and hands held low, the elbows are close to but not touching the body.
After finding, as explained above, the relative position of feet and ball, take your stance, with toes slightly turned out, with weight mostly on heels and equally distributed on both feet, and with knees slightly bent.
The stance for long-iron shots differs from the stance for those played with wooden clubs only in that the right foot is slightly advanced, i.e. nearer the parallel line by about five inches (see Fig. 6).
For high-pitched mashie shots the right foot is still farther advanced,
difference in this case being about ten inches (see Fig. 7).
For chip shots the stance is very “open,” the right foot being about twelve inches farther forward than the left (see Fig. 8). You will also note that in playing the chip shot it is necessary to stand much closer to the ball.
The reason for these different stances is explained in the next chapter, dealing with the Swing.
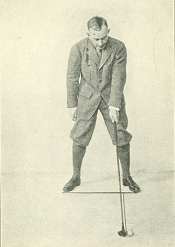
Fig 2: How to grip with left hand – D Hunter
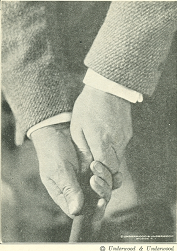
Figure 3 Showing the grip with both hands
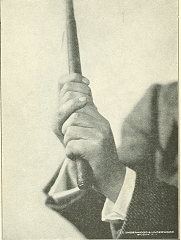
Figure 4. Illustrating overlap
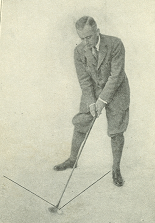
Figure 5. Stance for driver

Figure 6. Stance for Iron Club

Figure 7. Stance for Mashie
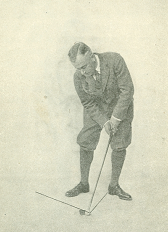
Figure 8. Stance for Chip Shots